
Anatomy of a Facebook Page
Time to roll up your sleeves and get your hands dirty. This section takes you through the basics of getting your Page set up just right.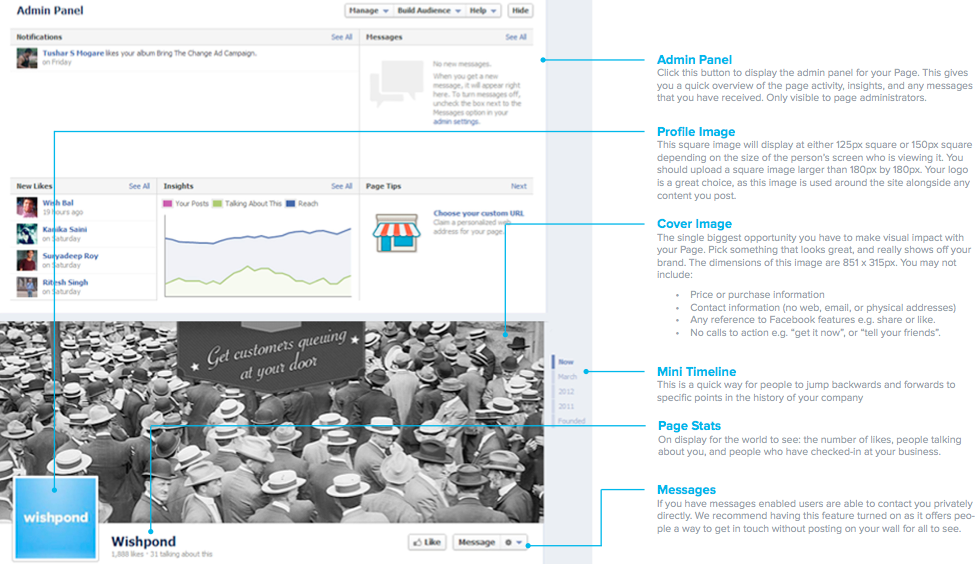

How to create your Page
 Now that you know what is what, it is time to get down to business.
Creating your page is simple. Head over to www.facebook.com/pages/create.php and follow the instructions that Facebook gives you. The first step is to choose which category your page will fit in to. Be sure to choose an appropriate category, as it will help your fans find you. I know, we have all been tempted to jokingly list our business as a political party, or religious organisation, or something equally kooky, but in general this isn’t nearly as great an idea as it first seems.
Once you have chosen your category Facebook does a great job of taking you through getting the basic building blocks of your Page set up. We would advise you to provide as much detail as you can during this set up phase, as it will limit the amount of time you need to spend going back and adding and changing information in the future.
Now that you know what is what, it is time to get down to business.
Creating your page is simple. Head over to www.facebook.com/pages/create.php and follow the instructions that Facebook gives you. The first step is to choose which category your page will fit in to. Be sure to choose an appropriate category, as it will help your fans find you. I know, we have all been tempted to jokingly list our business as a political party, or religious organisation, or something equally kooky, but in general this isn’t nearly as great an idea as it first seems.
Once you have chosen your category Facebook does a great job of taking you through getting the basic building blocks of your Page set up. We would advise you to provide as much detail as you can during this set up phase, as it will limit the amount of time you need to spend going back and adding and changing information in the future.
Designing your Page
The most important piece of real estate on your profile is your header image. This is your chance to capture your potential new fans attention, and show off your brand personality. The dimensions for this image are 851px by 315 px. Be sure to upload an image that is at least this large, or your image will be scaled up to fit (and therefore appear low quality). There are some limitations to what you can do with this image. According to Facebook you may not include:- Price or purchase information, such as “40% off” or “Download it at our website”
- Contact information, such as web address, email, mailing address or other information intended for your Page’s About section
- References to user interface elements, such as Like or Share, or any other Facebook site features
- Calls to action, such as “Get it now” or “Tell your friends”